360 Videos - The Complete Tutorial
Table of contents:
Short Version
This page guides you through every step from capturing 360 video to publishing it on Youtube VR. There is nothing commercial to this site, these are just the tools I use. The short version consists of these four steps
- Film with the Insta360 X3 camera
- Extract 360 video segments using Insta360 Studio
- Edit with Adobe Premiere Pro
- Publish on Youtube
And this is the result, the subjectively best video so far! Remember to manually set the quality to max, currently 2160s.
Long Version
The goal of this tutorial is to provide you with tools so you can learn to create good enough 360 videos. I aim for one or two hours at the computer after capturing the actual footage. Let’s get started!
1 Filming
When filming the 360 video there are a few things to keep in mind. Remember you are going to watch this with VR googles, and that is the experience you want to enhance.
1.1 Camera
First of all, get your hands on a 360 camera! I chose the Insta360 X3 mainly because it has an optional dive case, and nowadays it’s even got a invisible dive case! It’s also easy to export video in a usable format, for example .mp4. You don’t need higher resolution yet since Youtube VR doesn’t support it anyway. Here’s a link to that:
https://store.insta360.com/product/x3…

1.2 Camera Placement
Keep the camera steady. Any movement is in VR experienced as an unvoluntary movement and is not likeable to watch. Like this part of the video:
I included it anyway since I want to remember that part aswell. But you get the point. A steady hand while diving can be steady enough but the best result is achieved when the camera is fixed. Like so (click and drag to move the camera angle):
Keep in mind that when you view the video in VR, it’s going to feel like your head is where the camera is. Placing the camera at reasonable head height is a good idea. Put it too low and it’s going to feel like you’re an ant, too high and it’ll feel like you’re flying. It can be tricky to get a feeling for how far from the camera you can place objects and still get a decent view. Remember it’s all about the angle and the FOV of the camera that the object occupy, not the actual distance. For example, to get a view of a face at a normal conversation distance, it is just the same as IRL. About 1 m should do.
1.3 Lights
Generally speaking, the more lights the better. Outside, sunlight is perfect. For caves or other dark environments, three video lights with about 120° angle at about 1 meter distance from the camera is good enough. Direct the lights not straight but at an angle away from the camera. That way the visible shadows give you a sense of depth and 3D, even though 360 video still is 2D. Try to spread the light intensity evenly over the entire scene. Placing a light too close to an object or putting it on a higher intensity than other lights might oversaturate the video. Getting the camera directly in the light beam will create artifacts and reflections on the lens or dive case.
2 Extract 360 Video Segments
The Insta360 camera produces three files for every clip. Two .insv video files, one for each camera sensor, and a .lrv file which contains orientational data from the accelerometer.

Copy those from the camera to somewhere on your computer. Then go download and install the Insta360 Studio and you’re ready for the next step!
2.1 Choose Time Segments
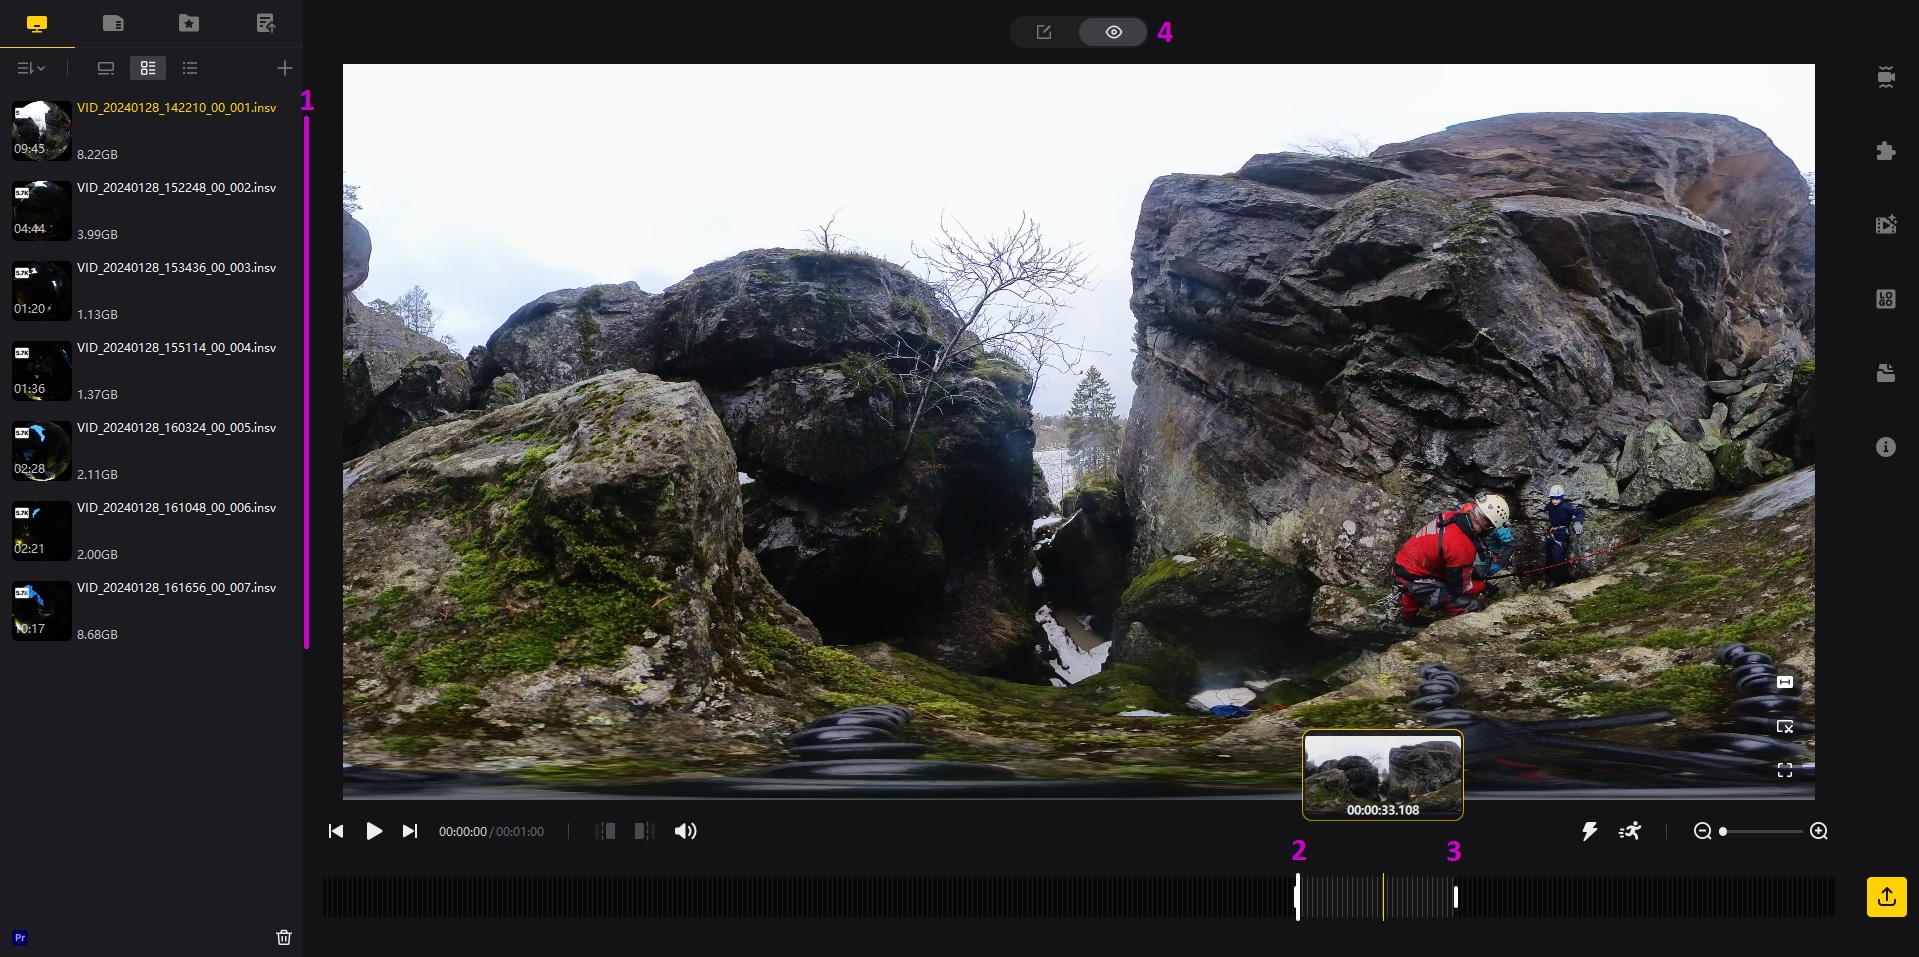
Go ahead and open the Insta360 Studio program. Click on “Open Files” and import all the files you are interested in. They will show up as clips in the list to the left [1]. For each item in the list, select which segment of the video you are interested in using further on by setting the beginning and end markers [2] and [3]. Circa 1 minute long clips is a good target. Take a few seconds margins in both ends to have some extra for video effects. You can use the buttons at [4] to change between the 360 view and the monoscopic view which is what you will see in your VR goggles.
2.2 Effects
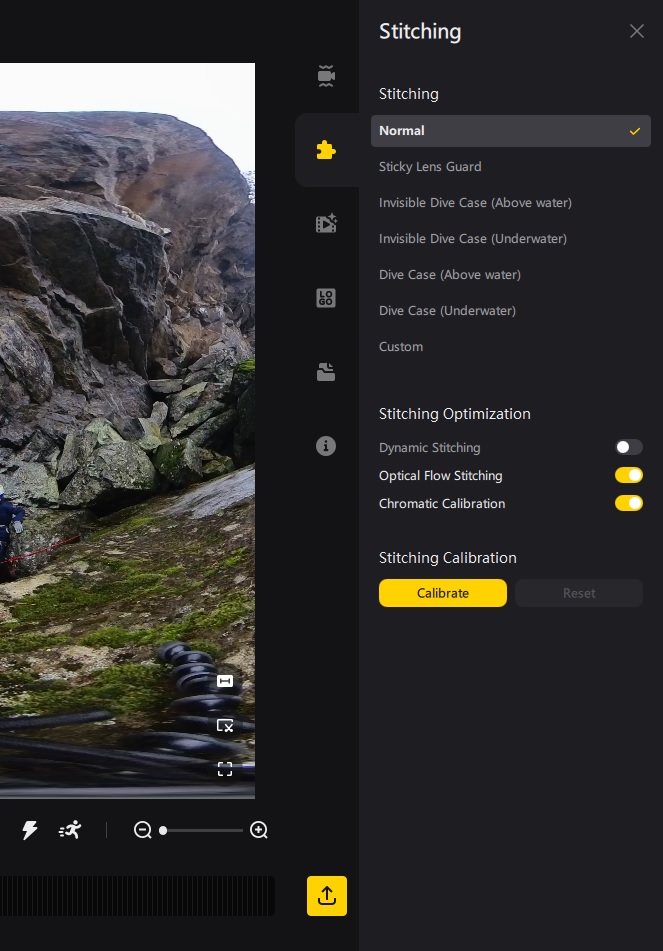
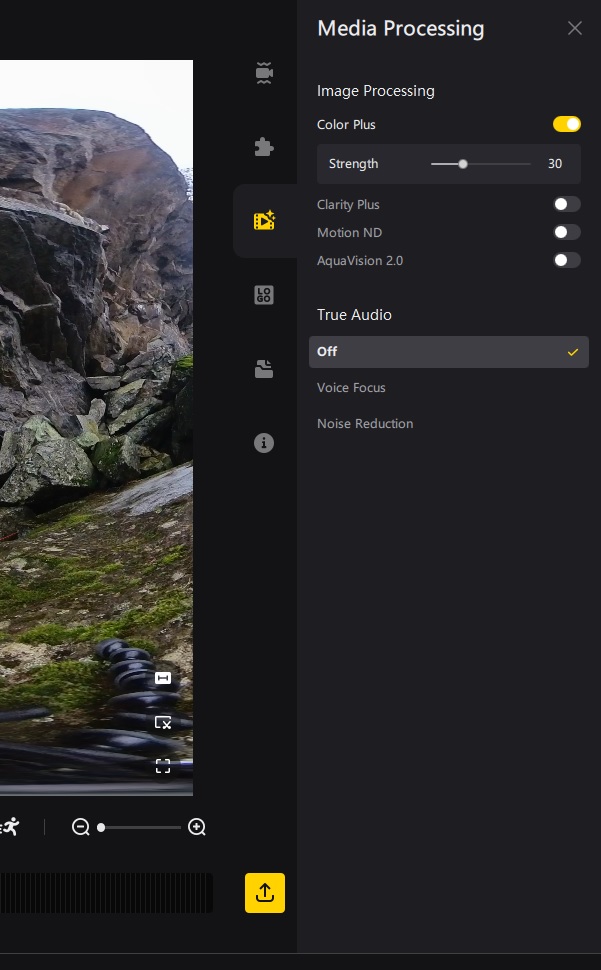
Double check that the stiching is correct for each clip. I also started using the color enhancing effects, either the Color Plus or AquaVision 2.0. This also needs to be set for each clip individually.
2.3 Export
Select all video clips you are interested in (shift or ctrl click), then right click and choose “Export”.
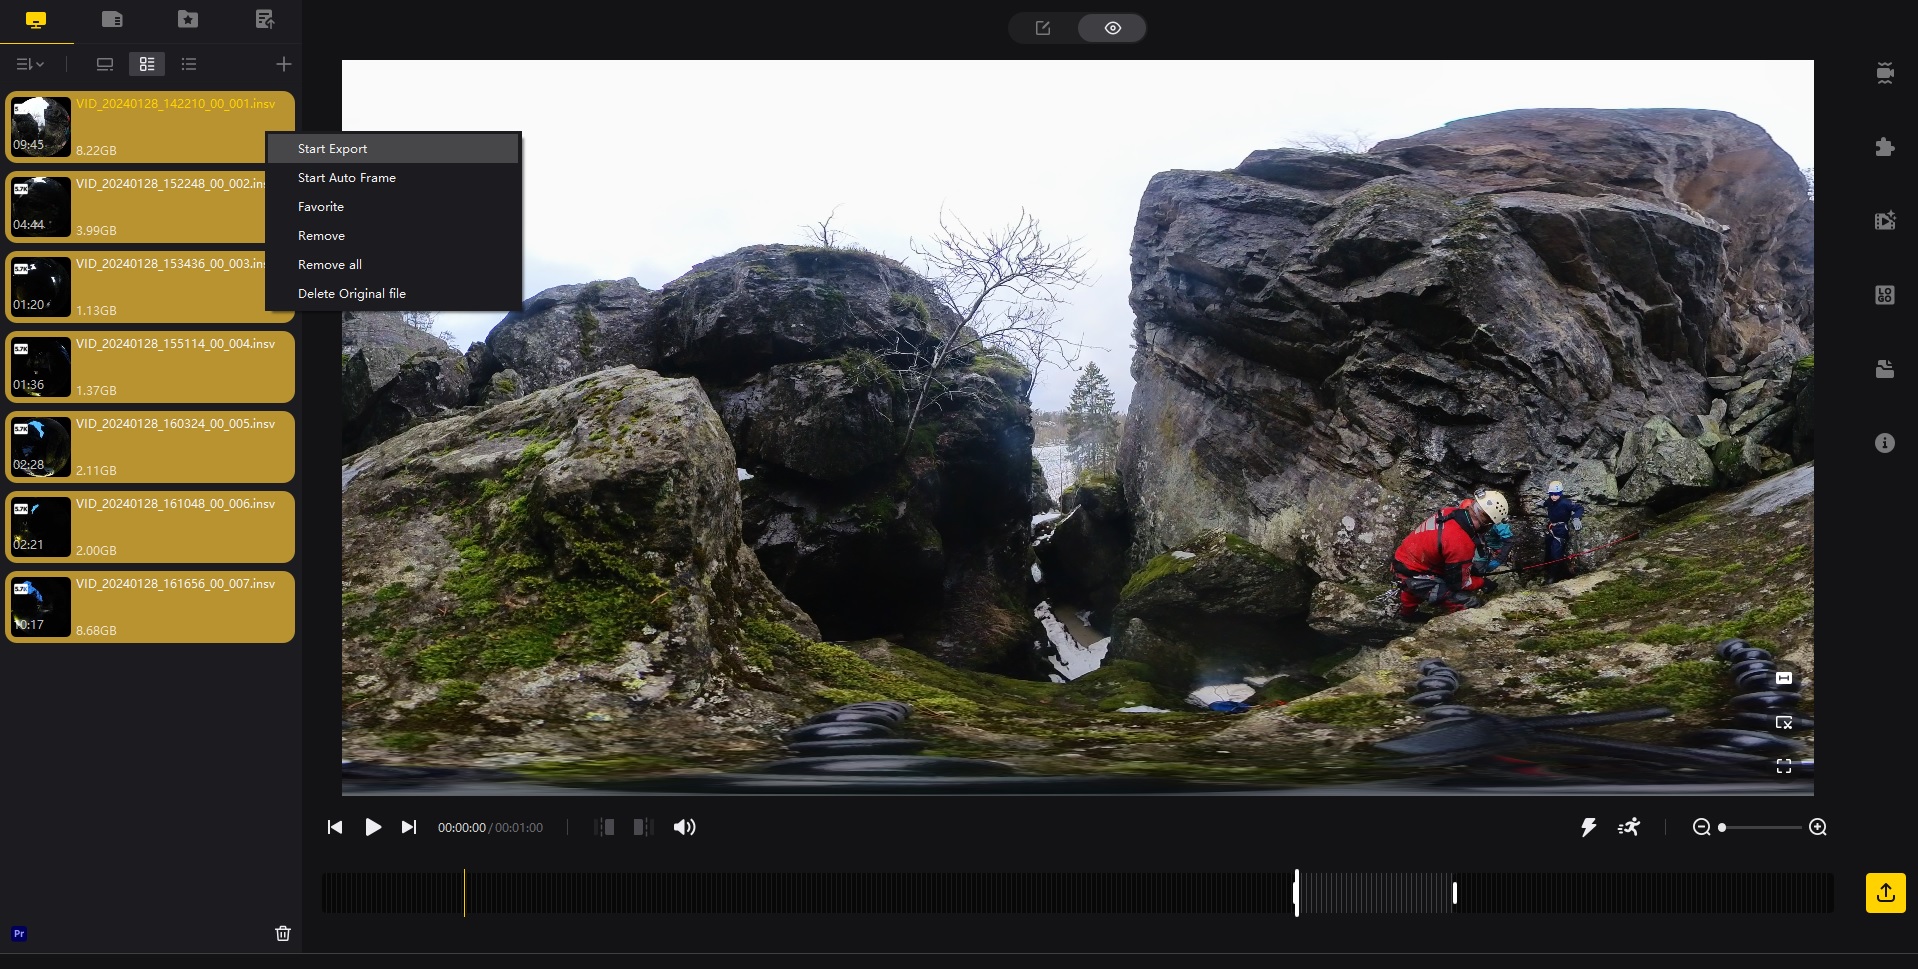
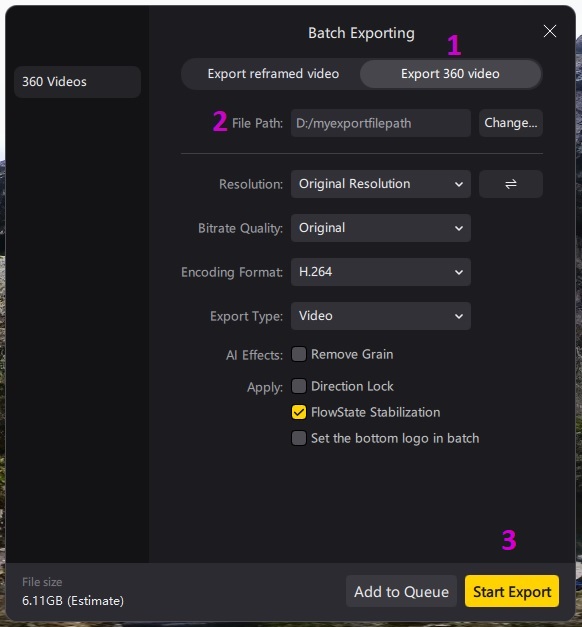
That will open up this dialog. Make sure you have “Export 360 Video” selected [1] and pick a suitable destination for your video files [2]. The rest of the settings can be left as is. Then hit the “Start Export” button [3]. The program will start converting your raw data to -mp4 files and all you have to do is wait
3 Edit
Now we got the material and we need to edit the movie, add some music, effects and we’re good to go!
3.1 Import to Premiere Pro
Ok, so now we need a decent video editing software. I searched far and wide but couldn’t find anything for free that could handle the resolution and VR. So Adobe Premiere Pro it is, and after a couple of years I’m still happy with it. Start by following the link, get a subscription and install the software.
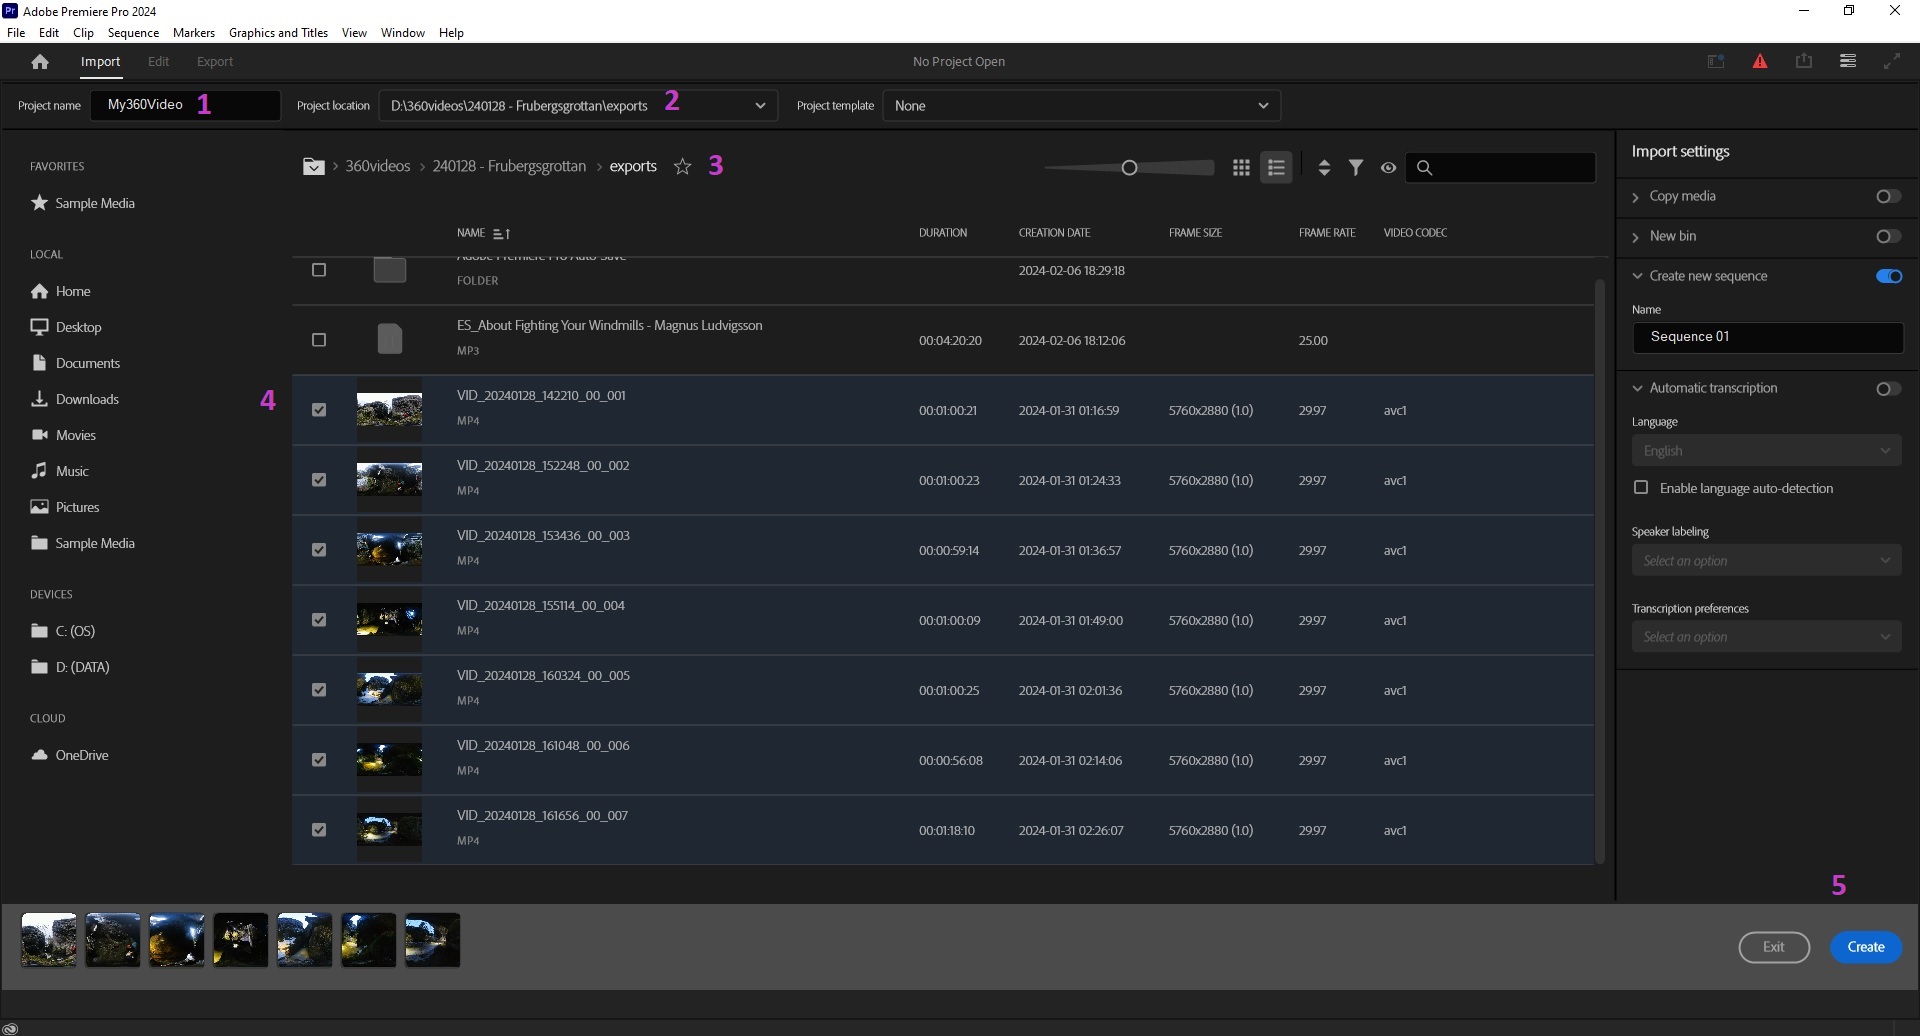
Now, open a new project and name it something relevant [1]. Put it in a relevant place [2], navigate to a folder [3] from where to get the video clips you just exported from Insta360 Studio and select the clips you want to include in the movie [4]. Hit the Create button [5].
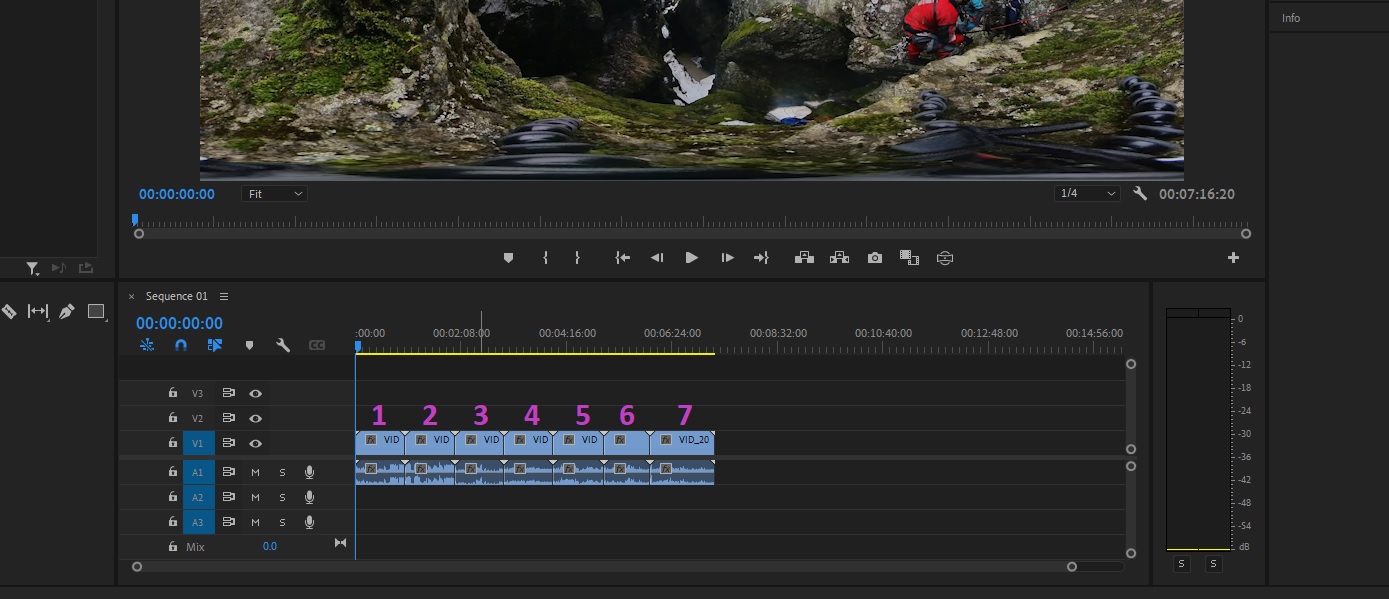
A project is created and the clips are lined up in a nice sequence. You can use this to estimate the final duration of your movie. I usually count the number clips, 7 in this case, and estimate 40 seconds on average per clip which in this case gives 7*40=280 seconds or 4 minutes 40 seconds. Now we know how much suitable music we need to find!
3.2 Add Music
I experimented with different free music libraries but eventually I turned to Epidemic Sound, it’s great really and at a fair price. Even professionals use it for TV series! Browse their music library, find something good enough for your video and download it. Drag and drop the .mp3 file into the Premiere Pro project et voilà, the hills are alive!
3.3 Default Orientation
One thing that really improves the user experience is to set a default orientation to each clip/video element. That way when the scene changes there will immediately be something interesting in view. Then you don’t have too look around with the googles or phone and try to find the action. You can see that I just recently discovered how to do this, and I’ve actually only done it in two videos so far. In the video before and in this one:
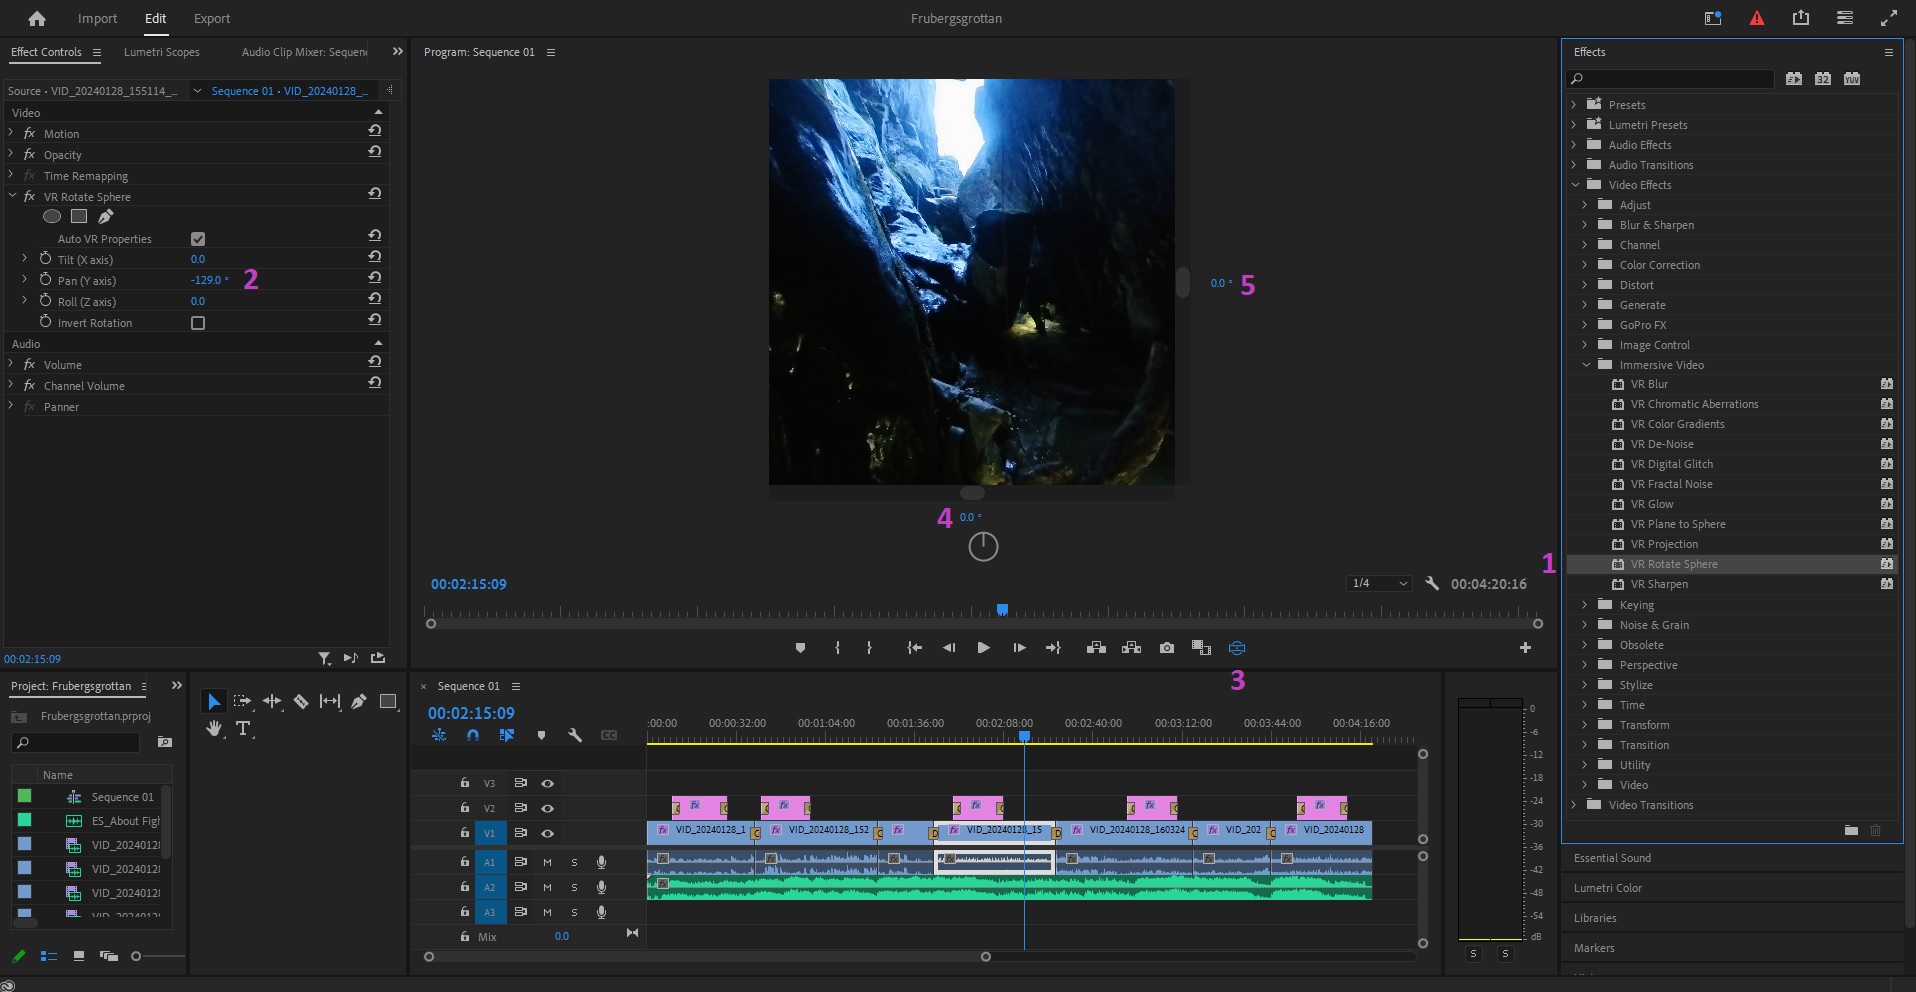
It’s really a game changer. And you do it by navigating to the effects and the Effects->Video Effects->Immersive Video->VR Rotate Sphere and drag and drop it onto your clip [1]. Then you can change the default orientation by dragging the Pan (Y axis) [2] value in the Effect Controls panel. To get a view of what it will look like, find the Toggle VR Video Display button [3] and click it. That button is not enabled by default, but there’s a description on how to do it here. Make sure the view controls are at 0° [4] and [5]. Repeat this process for all video elements.
3.4 Text
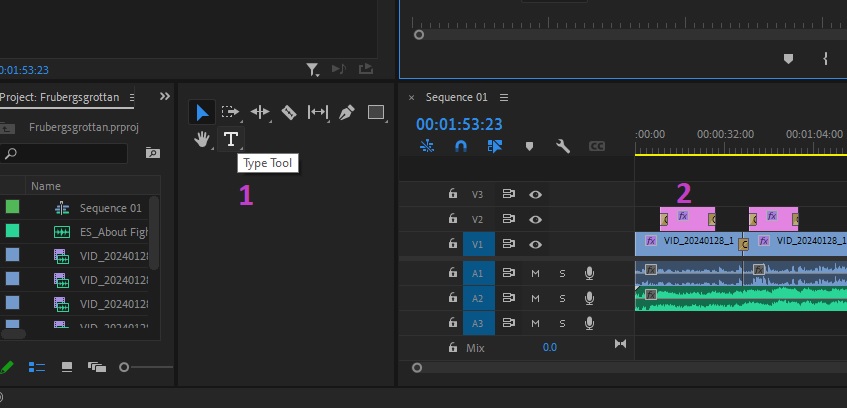
Sometimes you want to add a title or a description or any text element you can imagine to your video. Then there are a couple of things you should know. To add a text element, just click the Type Tool [1] and drag and drop it somewhere in the video. The text element will apppear in the sequence as a pink bar [2] above your video clips.
You need two effects on the text element. Drag and drop the VR Plane to Sphere effect onto the pink text bar. Make sure the Scale property is set to 100.00. This will warp the text so it looks normal in VR. Then drag and drop the VR Rotate Sphere effect onto the text element aswell. With this you can reposition the text in the VR environment. Use the VR Video Display from the last section to confirm that the text looks allright. I think a half transparent dark background looks good and makes the text more readable.
3.5 Transitions
Now adjust the length of your clips, I usually aim for somwhere between 20 and 60 seconds. This gives you time to look around without becoming bored. Play around with effects and synchronize with the music until you’re satisfied. Two effects I frequently use are the video transitions. I usually stick to the Dip to Black transition and the Cross Dissolve transition. You could put the cross dissolve effect on the text elements aswell to make them appear more smoothly. This video’s got them all
3.6 Export
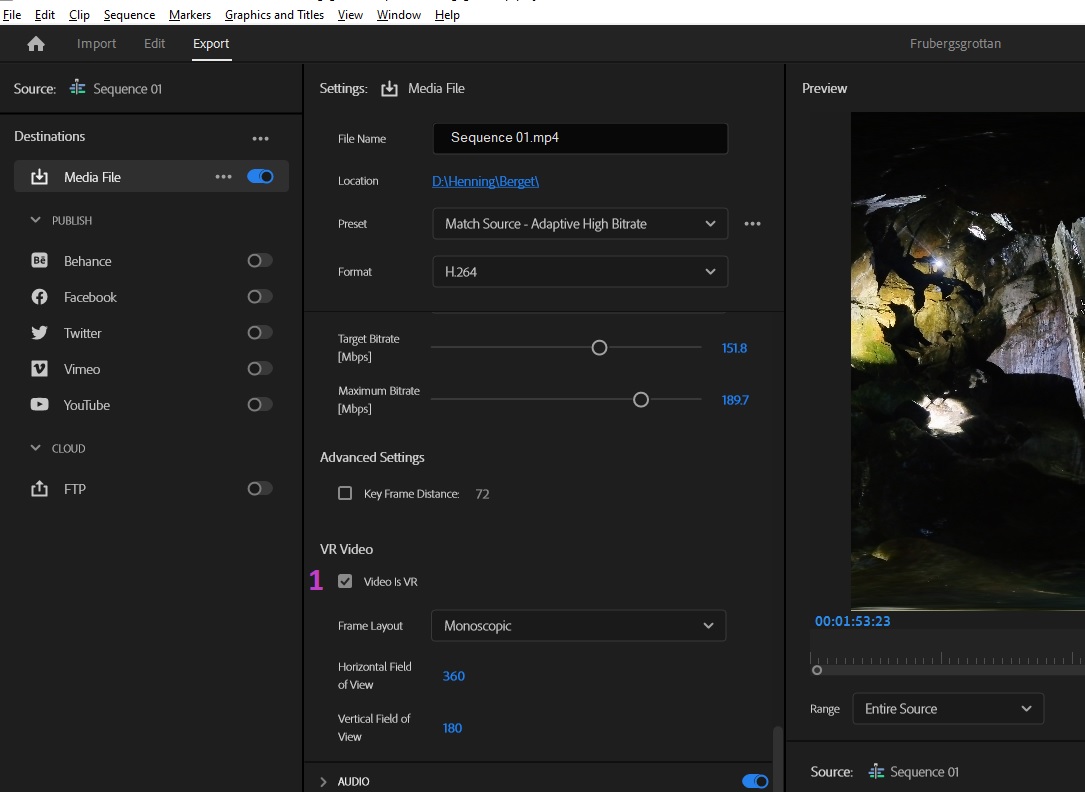
Well done if you made it this far! All the hard work is finally done and it’s time to export everything to a single file! It’s pretty straight forward BUT it is really important to make sure that the box for Video Is VR is ticked! [1] You find it in the Export tab, settings panel Settings->Video->More->VR Video->Video Is VR. The rest can be default values, now click Export aaaand wait, this might take a while!
4 Youtube
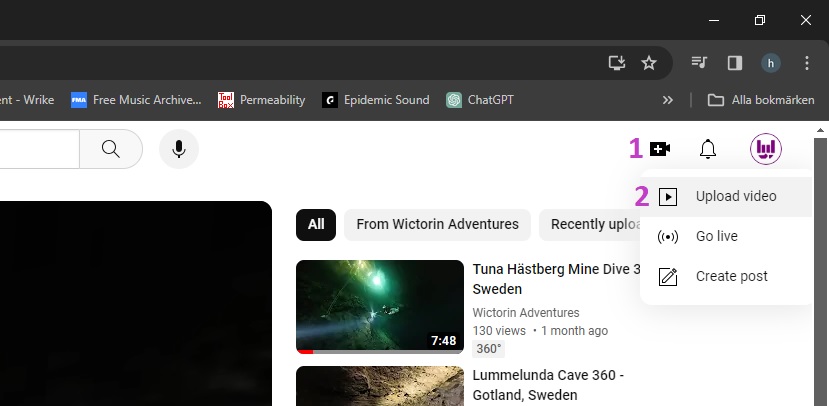
Video is complete, now, how can we watch it? You need a pair of goggles, I’m still running the first version of Oculus Quest and they work perfectly fine. Actually I’m not sure you can by those anymore but I included a link to other alternatives from Meta. Then somehow you need to get the video from the computer to the headset. The easiest way I found is simply to upload them to Youtube. If you have a youtube account, just click the Create button [1] and Upload video [2]. Upload your freshly exported video file and follow the instructions on Youtube.
Download the Youtube VR app to your VR headset and start watching! Remember to set the resolution to max! Congratulations for making it all the way through, and thanks for reading. Now get out there and shoot videos and contribute! There are more amazing places in the world to document than we could ever manage alone! When you add up all this you can now create videos like this (like I said in the beginning) the best I made so far, hope you enjoy
Links
Camera
https://store.insta360.com/product/x3…
Insta360 Studio
https://www.insta360.com/download/app/studio2019
Adobe Premiere Pro
https://www.adobe.com/se/products/premiere/…
Epidemic Sound
https://www.epidemicsound.com/
Meta Quest
https://www.meta.com/se/quest/…
Youtube
https://www.youtube.com/